Object Detection with a Raspberry Pi and OpenCV
This post is a demonstration of how to perform AI object detection in real time using a Raspberry Pi with the official camera module. It is an update to the code from this blog by Tim from Core Electronics: “Object and Animal Recognition With Raspberry Pi and OpenCV”.
The main problem I had with this code was it uses OpenCV to capture the image from the camera, however I could not get OpenCV to work with the official Raspberry Pi camera module that plugs into the CSI camera port, which is the only camera I have. One source I read suggests OpenCV image capture only works with USB web cams but I do not have a USB web cam available.
There is an alternative Python module called picamera for capturing images from the official camera module, however this module does not work with the 64-bit version of the Raspberry Pi OS. I am using “bookworm” released in March 2024 which is the current recommended version at the time of writing. There is an updated version of the module though called picamera2 that does work with the 64-bit Raspberry Pi OS.
The Raspberry Pi O/S strongly encourages use of a Python virtual environment (venv) however the version of picamera2 published as at Dec 2024 does not seem to be easily installable in a virtual env using the conventional approach. When used in a virtual env it complains it cannot find the “libcamera” module even though it is installed. If you try and pip install picamera2 you will get this error on running code that attempts to use it:
ModuleNotFoundError: No module named 'libcamera'
To resolve this, I have found two methods:
Method 1 - Do Not Use a Venv:
One method of getting round this is to avoid virtual environments (against the advice) and install the required modules system-wide on the pi:
sudo apt install -y python3-picamera2
sudo apt install -y python3-opencv
Method 2 - Using a Python Virtual Env:
Use the “system-site-packages” option to virtual env.
Prior to installing you need “libcap-dev” installed, otherwise it will complain:
You need to install libcap development headers to build this module
The full venv installation process is as follows:
sudo apt-get install build-essential libcap-dev
python3 -m venv cam-env --system-site-packages
source cam-env/bin/activate
pip install picamera2
pip install opencv-python
The object detection neural network model and other files used in this code (files in the directory “Object_Detection_Files”) can be obtained from a ZIP file attached right at the end of this blog. The model (MobileNet v3) is trained on the “Common Objects in Context” data set.
The working code I ended up with is as follows.
Note my camera module is upside down and there is a line that rotates the image 180 degrees. If your camera module is right way up, simply comment this line out.
#!/usr/bin/env python3
import cv2
from picamera2 import Picamera2
import numpy as np
def configDNN():
classNames = []
classFile = "Object_Detection_Files/coco.names"
with open(classFile,"rt") as f:
classNames = f.read().rstrip("\n").split("\n")
#This is to pull the information about what each object should look like
configPath = "Object_Detection_Files/ssd_mobilenet_v3_large_coco_2020_01_14.pbtxt"
weightsPath = "Object_Detection_Files/frozen_inference_graph.pb"
dnn = cv2.dnn_DetectionModel(weightsPath,configPath)
dnn.setInputSize(320,320)
dnn.setInputScale(1.0/ 127.5)
dnn.setInputMean((127.5, 127.5, 127.5))
dnn.setInputSwapRB(True)
return( dnn, classNames )
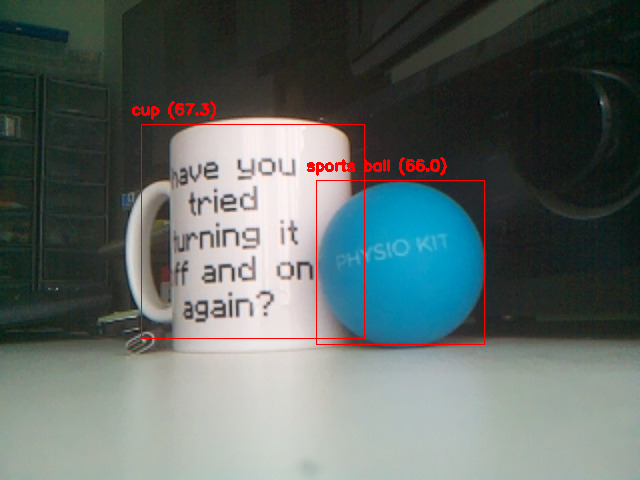
#thres = confidence threshold before an object is detected
#nms = Non-Maximum Suppression - higher percentage reduces number of overlapping detected boxes
#objects = list of names of specific objects to detect or empty array for all available objects
def objectRecognition(dnn, classNames, image, thres, nms, draw=True, objects=[]):
classIds, confs, bbox = dnn.detect(image,confThreshold=thres,nmsThreshold=nms)
if len(objects) == 0:
objects = classNames
recognisedObjects =[]
if len(classIds) != 0:
for classId, confidence,box in zip(classIds.flatten(),confs.flatten(),bbox):
className = classNames[classId - 1]
if className in objects:
recognisedObjects.append([box,className])
if (draw):
cv2.rectangle(image,box,color=(0,0,255),thickness=1)
cv2.putText(image,classNames[classId-1] + " ("+str(round(confidence*100,2))+")",(box[0]-10,box[1]-10), cv2.FONT_HERSHEY_SIMPLEX,0.5,(0,0,255),2)
return image,recognisedObjects
#Below determines the size of the live feed window that will be displayed on the Raspberry Pi OS
if __name__ == "__main__":
( dnn, classNames ) = configDNN()
picam2 = Picamera2()
#Set the camera format to RGB instead of the default RGBA
config = picam2.create_preview_configuration({'format': 'RGB888'})
picam2.configure(config)
picam2.start()
while(True):
#Copy the camera image into an array
pc2array = picam2.capture_array()
#Rotate the image 180Degrees if the camera is upside down
pc2array = np.rot90(pc2array, 2).copy()
#Do the object recognition
result, objectInfo = objectRecognition( dnn, classNames, pc2array,0.6,0.6)
#Show it in a window
cv2.imshow("Output",pc2array)
cv2.waitKey(50)